
Welcome to the first part of our new series on responding to macOS attacks. In this series we will be covering the multiple stages of attacks using the MITRE ATT&CK framework for macOS. If we filter on macOS techniques there are 151 techniques. For the purpose of this series we will filter on (sub)techniques that are unique to macOS and where we have seen actual threat actors using the (sub)techniques. That leaves us with about 50 (sub)techniques. You can find the MITRE layer on our GitHub, together with a mindmap based on the (sub)techniques relevant to this series.
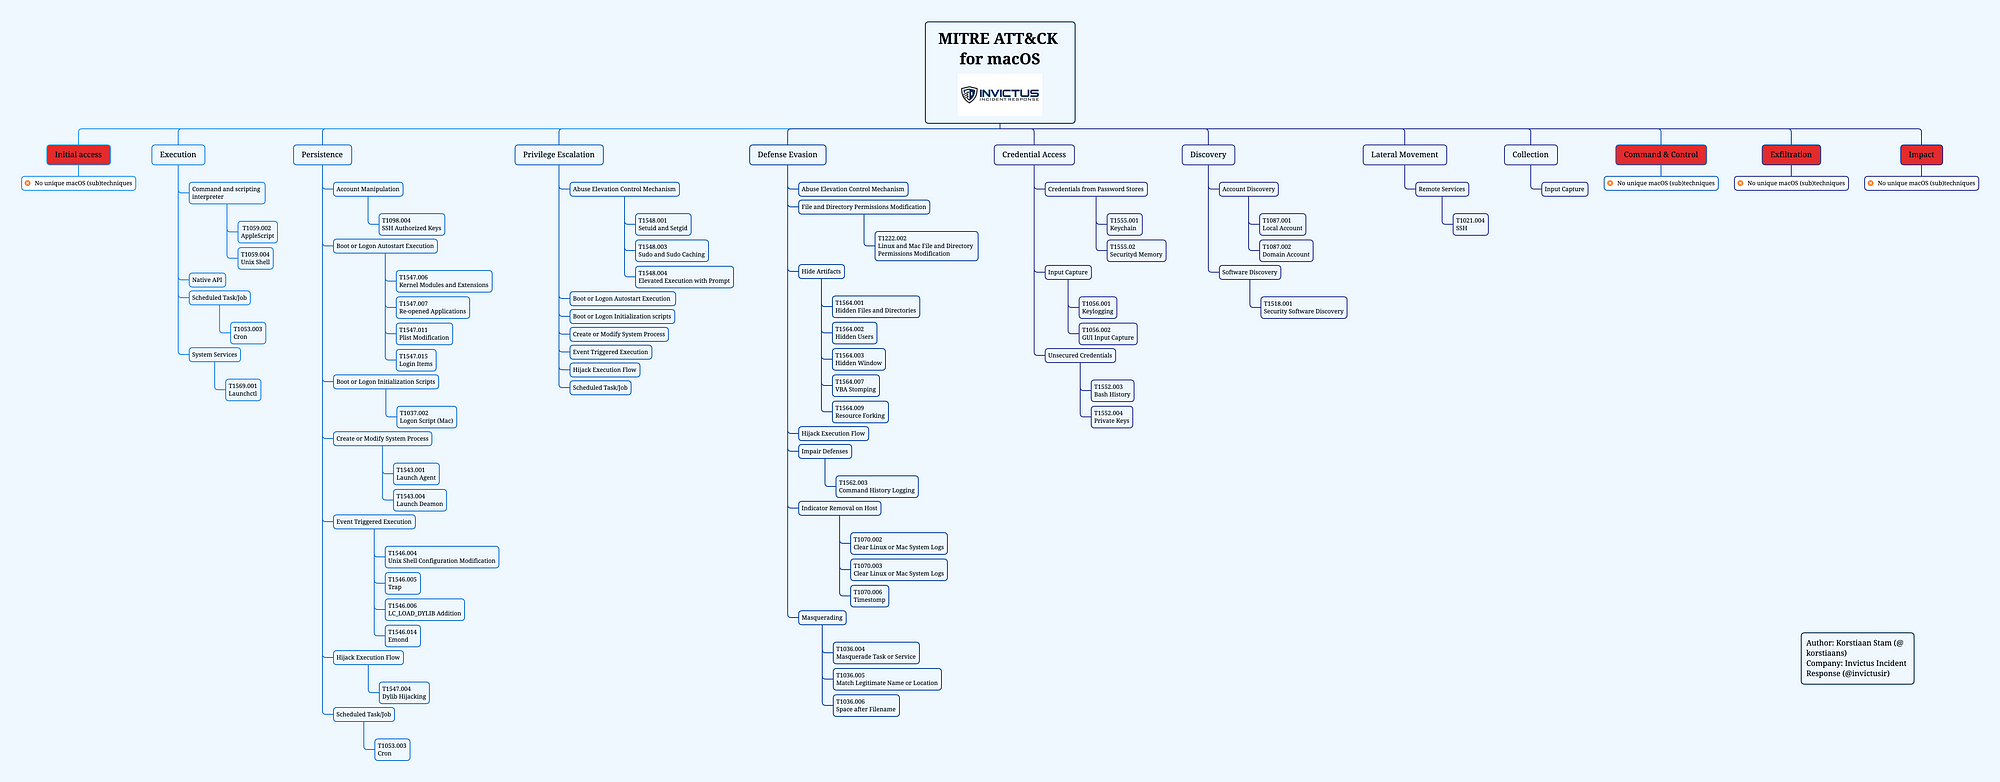
Structure
As for the structure of the series, for each MITRE phase we will discuss the relevant (sub)techniques and the operating system artefacts generated when a threat actor leverages a certain technique. That last part will be done by either running real malware samples in our lab environment or using adversary emulation. More on that later in this blog.
Part 1
In this post you will find an introduction for this blog series, the way we have setup our test environment. Next up we show the techniques for the MITRE phases ‘Initial access’ and ‘Execution’. If you want to read other parts of this series see our blog on Medium.
Introduction
According to the latest statistics from statcounter, Apple macOS accounts for almost 16% of desktops.

It is the second most popular operating system after Windows. With the growing popularity of macOS in enterprise as reported by Computerworld it is a matter of time before we will see more interest from cyber criminals in macOS. Even thought there have been some very interesting attacks agains macOS by threat actors categorised as advanced. However it seems there is a lot less resources available for security analysts and incident responders compared to Windows for instance.
This is something that we are trying to change with this series which has multiple goals, first explain the threats to macOS leveraging the MITRE ATT&CK framework and second empower security teams with information on how to find traces of attacks based on real malware samples.
Test environment
In order for us to test malware we need to have a virtual environment where we can launch malicious samples. To virtualise macOS you have a few options, the easiest one is if you’re working on a Macbook you can install virtualisation software such as VMware Fusion, or Parallels. For our test environment we use VMware Fusion.
Step 1: Download the macOS version you want to experiment with from the Apple Store. The most recent ones, Big Sur, Catalina and Mojave. You can find the rest with a simple Google search.
Step 2: After the download completes cancel the automatic installation that it tries to start and locate the downloaded file. It should be in /Applications directory and the name will be ‘Install macOS version name’.
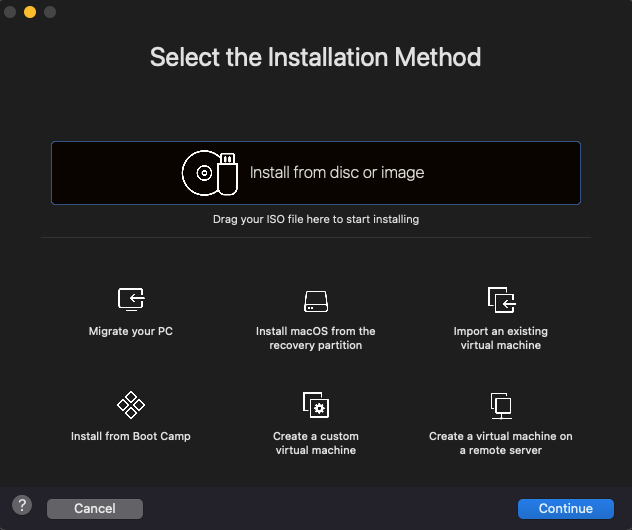
Step 3: Open VMware Fusion, click ‘Add new’ and you can drag and drop the installer file from step 2 into the menu:
Step 4: Customise the Virtual Machine they way you like it, suggest to give it at least 2–4 cores and 4–8 GB RAM. The installation will start and when you’re done you’ll have your own virtual macOS ready to go.
Phase 1 — Initial Access
Analysis of the Initial Access phase in the MITRE ATT&CK framework shows there are no unique (sub)techniques for MacOS.
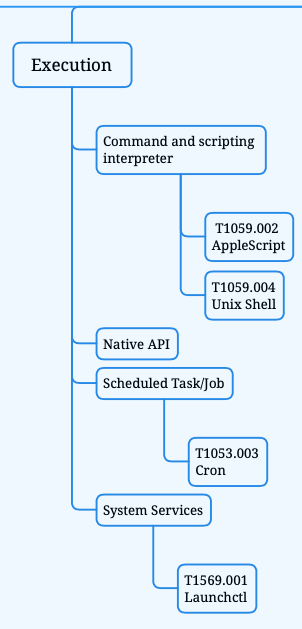
Phase 2 — Execution
The second phase of the Mitre ATT&CK framework is the Execution phase. Closer inspection of our mindmap with all the interesting techniques shows we have identified several techniques unique to macOS.
First we will discuss the techniques in more detail with examples of real attacks, followed by incident response advice.
Command and scripting interpreter
After a threat actor has gained access to a system they might want to execute programs or code. In macOS environments there are several ways threat actor carry out these tasks:
- AppleScript
- Unix Shell
AppleScript — T1059.002
AppleScript is a scripting language created by Apple. It allows users to directly control scriptable Macintosh applications, as well as parts of macOS itself. You can create scripts — sets of written instructions — to automate repetitive tasks, combine features from multiple scriptable applications, and create complex workflows. Source
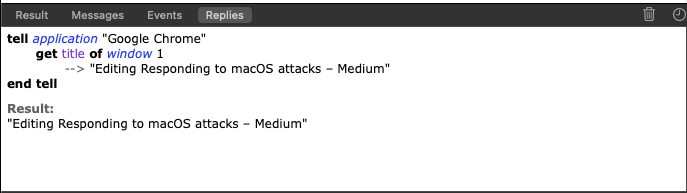
In short you can use AppleScript for a variety of things, if you are on a mac system, just open the Application ‘Script Editor’ which is a built-in editor for AppleScript and Javascript. It’s an interesting language and it is easy to read if you have the source code ofcourse. As an example consider the following AppleScript code:
The code will check the first (active) window for the Google Chrome application and the title of the browser tab you have open, see the result down below.
If you want to learn more about AppleScript I suggest you start with the official documentation and if you really like it you can start your developer career using this website. For now we are more interested in malicious usage of AppleScript, there is and has been some great coverage on macOS malware by SentinelOne. We suggest you to read all of it, but especially this blog by Philip Stokes explains some examples of how threat actors leverage AppleScript in attacks.
AppleScript, key takeaways for incident responders:
- AppleScript can be compiled as ‘run-only’ which means source code is not present with the file anymore;
- You can execute a ‘run-only’ script with the built-in ‘osascript’ utility or from another AppleScript more on that here;
- Reverse engineering AppleScript can be done with the AEVT tool from SentinelOne;
- AppleScript can be exported in multiple formats even as a fully built application that can be signed to run locally.
Unix Shell — T1059.004
Another relevant technique is the usage of Unix Shell by threat actors. MacOS uses either the zsh (Z shell) or bash (Bourne Again Shell). For recent macOS distributions the default shell is zsh. You can use the Unix shell to run commands, programs or a set of instructions, basically you can do almost everything within the shell. For incident response purpose there are some valuable artefacts to determine what happened in the Unix Shell. To get the full history of zsh including timestamps you can use the following command:
history -df 0
The -d flag is used for the timestamp
The -f flag is for the date
The ‘0’ gets all history and not just the most recent 15 entries.
Below an example of the history file, where you see a sequence of commands that would normally trigger further investigation.

Additionally you can inspect the .zsh_sessions directory which is stored in the root folder of the user, use the following command to get to the directory.
cd ~/.zsh_sessions
Depending on the previous activity of the user and device you are investigating the directory contains historic session and history files see example below:

You can inspect the session files they will contain a timestamp that shows when this specific session was restored. Every time you quit the terminal application and open it back up again this file will be updated*.
*settings can be changed by user and/or terminal program that is used.
Unix shell, key takeaways for incident responders:
- The history file can be very useful for your investigation, especially when the threat actor performed interactive activity;
- Be careful though, it’s trivial to change or remove the history file;
- The Unix shell used on a certain macOS can differ, however the default shell is zsh since macOS Catalina;
Native API — T1106
Another technique threat actors can leverage is the native macOS API to perform malicious activity. This method is powerful, because with the native APIs you can directly call low-level OS services within the kernel.
As a macOS (malware) developer you can use the Cocoa Framework to build software that interacts with the native API. Another possibility with direct API access is the ability to bypass security products. Security products often hook functions in an operating system.
Hooking is a technique to alter the behavior of an application, allowing EDR tools to monitor the execution flow that occurs in a process, gather information for behavior-based analytics and detect suspicious and malicious activity. Source
From an incident response perspective this technique can be challenging to investigate, for several reasons. First there is no such thing as a log that collects all API calls. Second, even if there was such a file it would be easily overwritten by other API calls.
Let’s look at some examples that were used by threat actors.
WindTail
An excellent write-up on this piece of malware was done by Objective-See. The malware was most likely used by an APT and is highly targeted. So we should be happy that we have this malware to analyse. If you are interested, please visit the Mac Malware collection hosted by Objective-See, so you can download it for yourself. WindTail uses multiple Native APIs, including:
- applicationDidFinishLaunching
- contentsOfDirectoryAtPath
- pathExtension
- compare
We will take a more detailed look at WindTail in the next series to analyse the persistence mechanism used by this malware.
XAgentOSX
For a full write-up on this malware take a look at this blog by Unit 42 from Palo Alto. In this malware there are several Command and Control (C2) commands that leverage the Native API:
- NSTask:launch, to execute a file;
- NSFileManager:removeFileAtPath, to delete a file;
- NSImage:initWithCGImage, method used for taking screenshots.
Now that we know this technique is used by threat actors, what can we do from an IR perspective. The honest answer is that we have to rely on Endpoint Detection & Response (EDR) tooling to tell us what APIs are called and we have to determine whether that is suspicious or malicious and requires further investigation. However, we have seen in the past that a lot of EDR tooling is not great with macOS malware. We are very happy to be partnered with SentinelOne, they are doing amazing working in the macOS space.
Native API, key takeaways for incident responders:
- Monitoring the Native API can be a challenge without endpoint security software;
- The Native API is often used to achieve persistence, proactively checking Launch Agents/Demons is advised. More on persistency in the next series.
Scheduled Task/Job
Moving on to another interesting technique that is used across phases in attacks and on multiple operating systems. The scheduled task/job is also a very popular method for persistency. However, in the context of the Execution phase a Scheduled Task/Job it used to execute malicious code.
Cron — T1053
Who doesn’t know good old Cron right? Just look at this amazing picture and it still works on a modern macOS.

There are multiple ways of using cron on a system. You can do a one-time execution of a task using the ‘at’ command as shown below. Or schedule a repetitive task with ‘crontab’. In this post we will focus on ‘at’ in the next series we will show you the working of ‘crontab’.
An example of running a task with ‘at’ is shown below:
Analysis of ‘at’ jobs can be performed with one the following files:
_ATJOB_DIR directory containing job files (/usr/lib/cron/jobs/)
_ATJOB_DIR/_LOCKFILE job-creation lock file (/usr/lib/cron/jobs/…)
_ATSPOOL_DIR directory containing output spool files(/usr/lib/cron/spool/)
The most interesting to determine what has happened on a system is in the jobs directory where you can find the command executed and the output of that command.
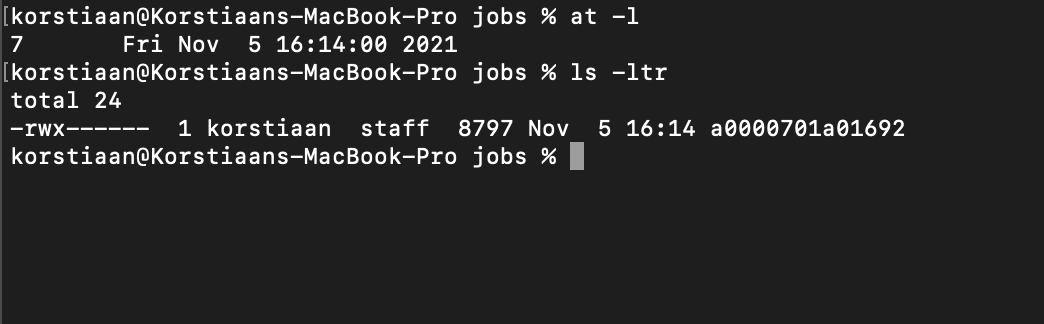
Tip: The ‘at -l’ command shows the timestamp of job execution, you can correlate that with the job in the /usr/lib/cron/jobs as shown in the picture below:
Janicab
sha256:962b879e9c5c821a0f6ca1c1a0f66912bd7e03b99da177b3c3a85de140140f02
Let’s look at an example in the wild, Janicab as reported by F-Secure.
This piece of malware has multiple tricks, but one is using a cron job to schedule tasks. When you run this sample it will fake a Java installation and several commands are executed on the command line. Running the sample in Hatching Triage, report here shows the following commands being executed:
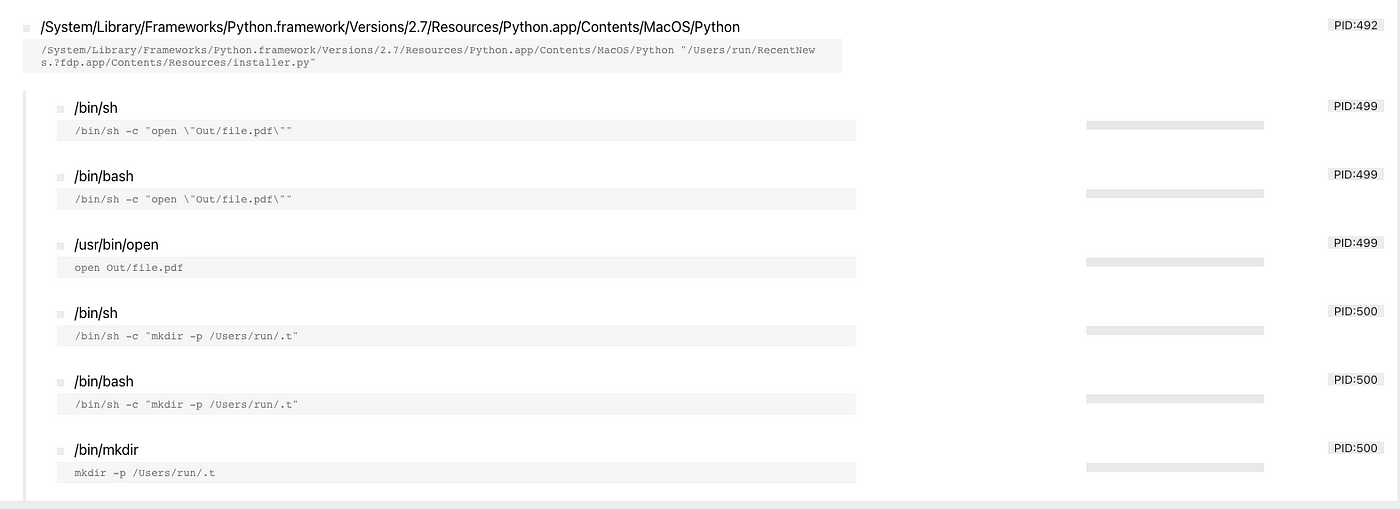
A hidden directory is created and from the reporting by F-Secure we have learnt that several cron jobs are created and results and scripts are stored in the hidden directory. As mentioned we will dive deeper into cron in the next series.
Scheduled Task/Job, key takeaways for incident responders:
- There are multiple methods automatically built-in macOS to run tasks or jobs;
- Cron and at are built-in utilities that can be used;
- Evidence of execution of a task or jobs is stored in log files;
- Evidence on what jobs were executed is stored in /usr/lib/cron
System services
In modern operating systems starting or scheduling a service can be used to execute a command or program. For macOS this done through ‘Launchctl’. The equivalent for Microsoft Windows is called services.exe.
Launchctl — T1569.001
Launchctl interfaces with launchd, the service management framework for macOS. Launchctl supports taking subcommands on the command-line, interactively, or even redirected from standard input.
Launchctl is another example of a technique that has multiple purposes for a threat actor it can be used for one-time execution or as a persistence mechanism by scheduling a service that starts a program when a machine is booted. There are a lot of commands Launchctl can take just running launchctl in a terminal shows the following options:

Let’s focus on something that has been used by threat actors in the past. Kaspersky reported on the Calisto Trojan and one of the commands used by the threat actors is this one:
launchctl list com.apple.screensharing >2/dev/null
With this command the threat actor enabled screen sharing. The launchtl list command can be useful as it’s a way to list the current status of services running on macOS.
Another example of launchctl usage was found in the LoudMiner cryptominer software as reported by Eset.
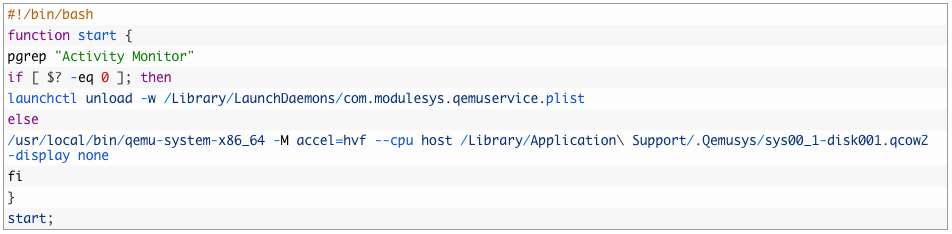
Take a look at the script above, launchctl is used on line 5 to stop the virtualisation software QEMU if ‘Activity Monitor’ is running this is likely an attempt to hinder analysis efforts. This shows the diversity of launchtctl it’s very powerful and it can be used to start/stop services, to achieve persistence to hide data almost anything is possible.
System services, key takeaways for incident responders:
- Monitor process executions to determine malicious usage;
- As mentioned early threat actors like to achieve persistence so monitor Launch Agents/Daemons directories.
Conclusion
This was the first part of our series on macOS incident response, we hope you liked it. Please follow us on LinkedIn & Twitter to stay updated on the latest and to learn when the next part of the series is out.
References & Resources
- https://www.youtube.com/watch?v=N_xBbDDycHo&ab_channel=ObjectivebytheSea (Presentation ATT&CK on MacOS techniques)
- https://www.makeuseof.com/tag/macos-windows-10-virtual-machine/
- https://www.sentinelone.com/labs/macos-incident-response-part-1-collecting-device-file-system-data/
- https://www.jamf.com/resources/white-papers/the-guide-to-successful-macos-security-incident-response/
- https://www.darkreading.com/threat-intelligence/new-tool-sheds-light-on-applescript-obfuscated-malware
- https://www.macworld.co.uk/feature/mac-viruses-list-3668354/
- https://scriptingosx.com/2019/06/moving-to-zsh-part-2-configuration-files/
- https://betterprogramming.pub/https-medium-com-ratik96-scheduling-jobs-with-crontab-on-macos-add5a8b26c30