Black Hat First Look: Meet the New Microsoft Extractor Suite v4
Introduction
This year, almost our entire team will be in Las Vegas for Black Hat! We'll be delivering training and showcasing the Microsoft Extractor Suite in the Arsenal area of the conference. If you’d like to connect, don’t hesitate to reach out!
Interested in finding out more about this toolkit or analyzing logs? Get hands-on experience with our training or investigating your own cloud incidents with Cloud Labs.
Of course, we can’t show up to Black Hat without something special, so we’ve updated the Extractor Suite with some exciting new features. Those attending Black Hat will be in for a special treat, but consider this blog a first look and update for the entire community.
If you are as excited as we are, jump below to start reading about the release notes and deep dive into a new function called Start-MESTriage, or even fire open PowerShell and run: Install-Module Microsoft-Extractor-Suite and for some, just hit update with: Update-Module Microsoft-Extractor-Suite. Let’s dive in!
Release notes
Introducing Start-MESTriage: Streamline Your Investigations with Ease
Every investigation is different, some require deep dives into sign-in logs, others focus on mailbox activity or role changes. Different teams often prefer different log sources and approaches depending on the type of incident. That’s why we built Start-MESTriage.
Start-MESTriage is a powerful new function in the Microsoft Extractor Suite that lets you define customizable templates for data collection. Instead of running each function manually, you can automate the entire triage process based on the type of incident you’re responding to. Whether you're investigating suspicious sign-ins, email forwarding rules, or cryptomining, Start-MESTriage allows you to align your data collection with internal playbooks, making it tailored to your needs.
What is Start-MESTriage?
Start-MESTriage is an automated triage function that orchestrates multiple data collection tasks across Azure, Entra ID, and Microsoft 365 environments in a single operation. Instead of manually running individual functions like Get-UAL, Get-MailboxRules, or Get-RiskyUsers separately, Start-MESTriage executes a coordinated collection based on defined templates that can be customized for different investigation scenarios.
How does Start-MESTriage work?
Start-MESTriage is built around a simple but powerful concept: templates. Each template defines which data sources should be collected, giving you full control over the acquisition process.
We've included three pre-defined templates to get you started, but the real value lies in customization. You can create templates that align with your specific incident types, team workflows, or organizational playbooks. We plan to expand the default template library with both community contributed playbooks and additional templates we develop internally, making it easier for everyone to get started and standardize their investigations.
Below is a simple three-step process for getting started:
1. Template Selection
Select from one of three built-in templates below or create your own:
- Quick Template: Essential data sources for rapid assessment.
- Standard Template: Balanced approach covering most investigation needs.
- Comprehensive Template: Extensive data collection across all available sources.
2. Target Definition
Specify your investigation scope:
# Single user investigation
# Multiple users
# Organization-wide (might be slow without user filter)
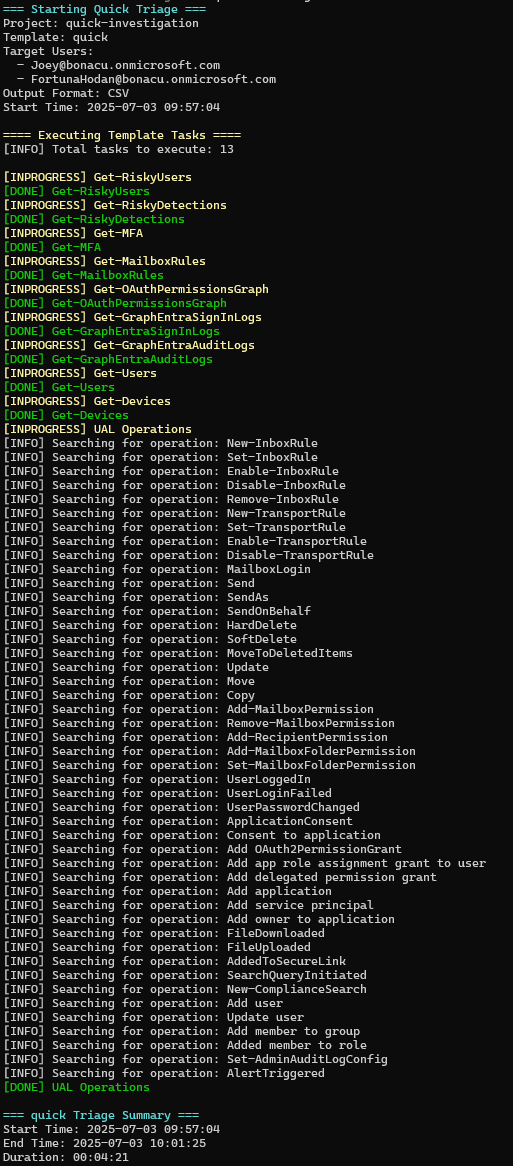
3. Automated Execution
Start-MESTriage handles the complexity:
- Progress Tracking: Real-time status updates for each task
- Error Handling: Failed tasks don't stop execution
- Smart Filtering: Automatically applies user filters where appropriate
- Output Organization: Results organized in logical directory structures
Template Customization: Make It Your Own
The real power of Start-MESTriage lies in customization. Templates are simple PowerShell data files (.psd1) that you can modify to match your exact investigation needs.
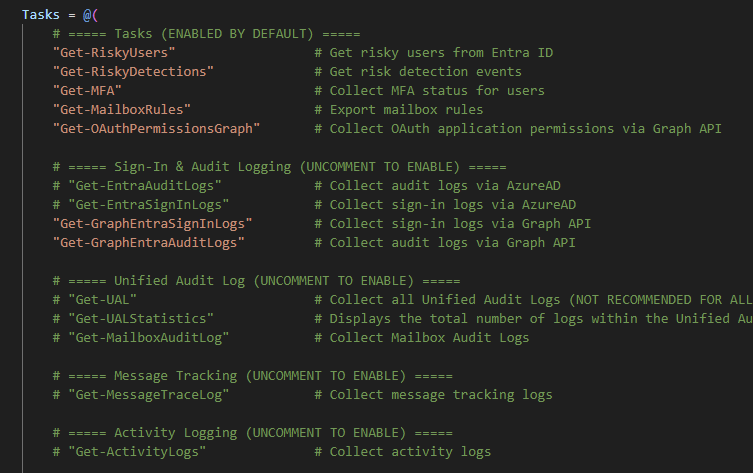
Understanding Template Structure
Templates contain two main sections:
Easy Customization: Comment/Uncomment
Enable or disable tasks by adding/removing #, as show in the following image:
Creating Custom Templates
Step 1: Create a new .psd1 file in the Templates directory, you can use the [custom].psd1 as an empty template file.
Step 2: Use your custom template:
That’s it! You’re ready to analyze the output according to your defined template based on incident type or team workflow. We’ll be sharing more at Black Hat on both the Microsoft Extractor Suite and Start-MESTriage, and we look forward to seeing many of you in Las Vegas
About Invictus Incident Response
We are an incident response company and we ❤️ the cloud and specialize in supporting organizations in preparing and responding to a cyber attack. We help our clients stay undefeated!
🆘 Incident Response support reach out to cert@invictus-ir.com or go to https://www.invictus-ir.com/24-7
Be ready for the next cloud incident.